
“I am under an odd situation where my customer needs a solution to export Office 365 mailboxes to PST. I asked him to configure O365 tenant in Outlook and use import export wizard to take out the PST file but, it got failed. This happened because the customer is using 2013 version of MS Outlook. Now, I am also not having any solution to the problem. I am posting this query here to know whether there exist any another workaround to download Office 365 to PST or not? If yes then, can anyone guide me with this?”
Alike the above query, there are many Microsoft users who are seeking or asking for solutions to archive Office 365 mailbox to PST. After devoting lots of time in research, I got two ways to the problem. This blog describes each and every step of measures and finally, the solution of the issue.
Solutions to Export Office 365 Mailboxes to PST
Either with help of eDiscovery or with PowerShell commands, users can attempt Office 365 backup on the local machine. Before executing these measures, keep one thing in mind that the approaches are only for the administrator account of Office 365. So, let’s begin!
Measure # 1: Save Office 365 Emails To PST Through eDiscovery
1. Login the Microsoft Office 365 portal and move towards the menu of Office 365 Admin Center
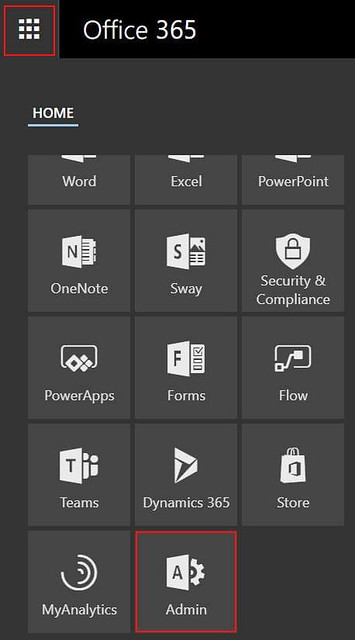
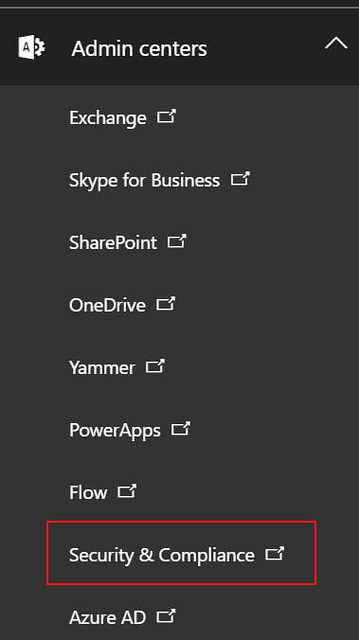
2. Click on Admin Centers to expand its menu and select the Security & Compliance option
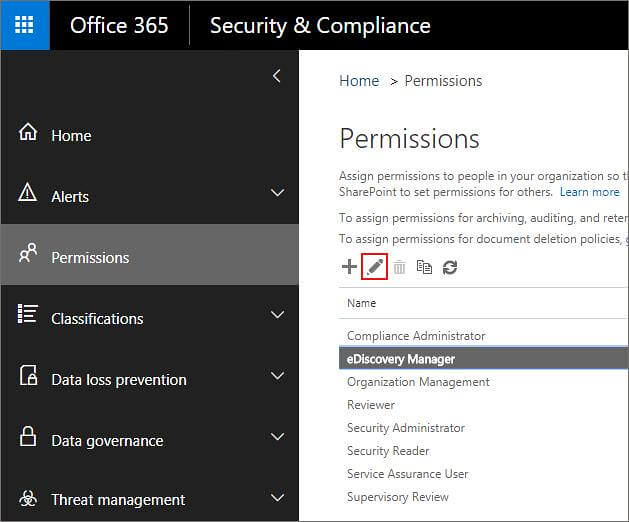
3. Hit on the Permissions option on the current page of security and compliance. From the list of a role group, select eDiscovery Manager and click on Edit icon. This step will help in acquiring all the permissions that are required to access eDiscovery manager
4. Click on the Add icon >> Save to create a new account in eDiscovery Administrator

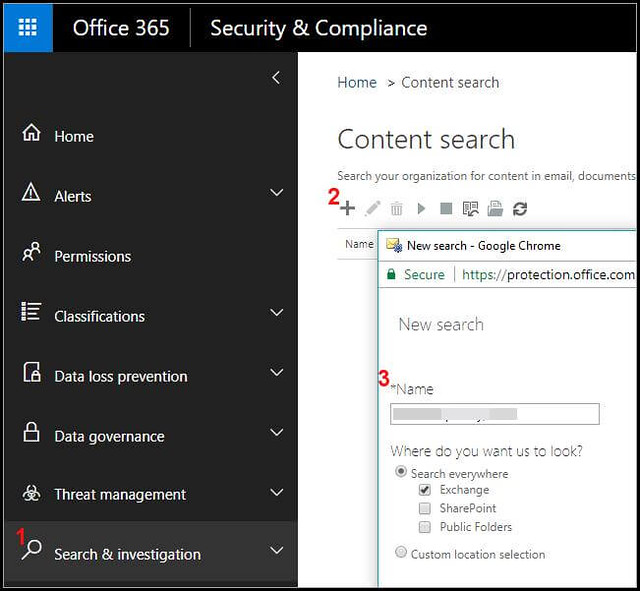
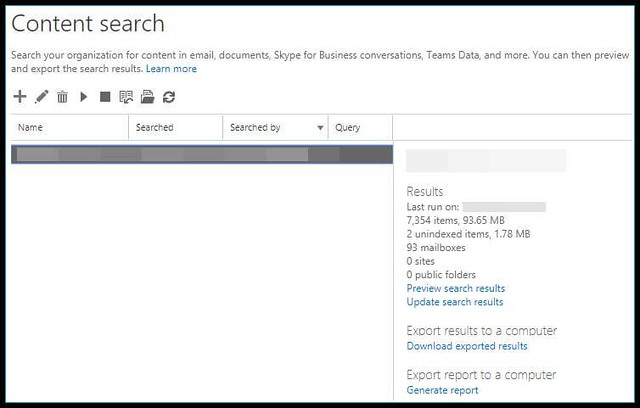
5. Now from the LHS of the screen, choose Search & investigation option and click Add This will open ‘Content Search’ screen in which you have to enter the name in current text box and click Next
Note: In case you don’t find ‘Add’ symbol then, this means that you have not configured eDiscovery permissions properly. Wait for 24 hours so that all permissions get properly configured in the newly created account.
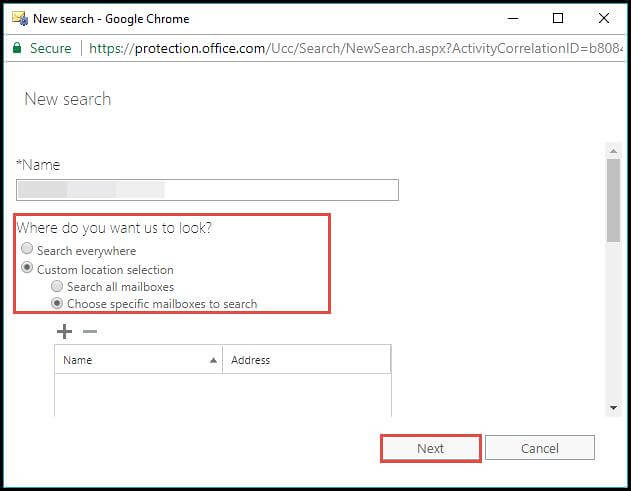
6. Click on Search everywhere >> Exchange for exporting all items from the mailboxes. If you do not want all mailboxes to be saved in PST format then, choose Custom location selection. Hit on the Plus symbol and then, highlight the source mailboxes that you want to export. Click on Add icon and then OK. Also, you can export data mailboxes of Public folders with help of ‘Search all public folders’ feature
7. You will be finding following filtering ways to look for desired items. Mention any of them and then proceed to next step :
- keywords or phrase
- time duration range
- From/To/Cc/Bcc field
- Define the message type
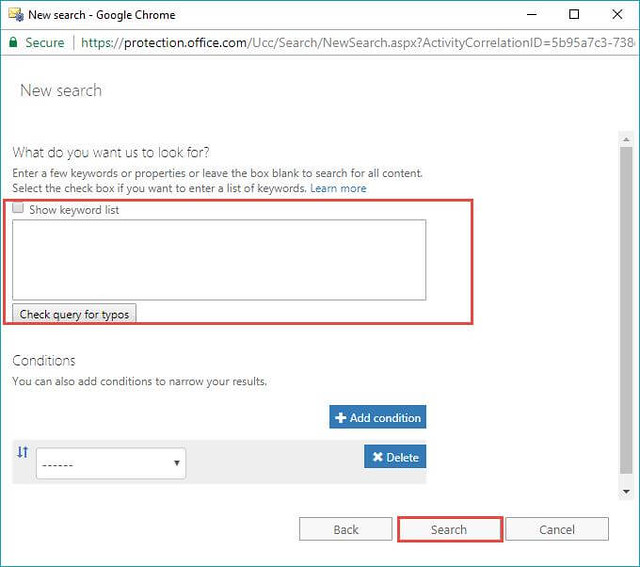
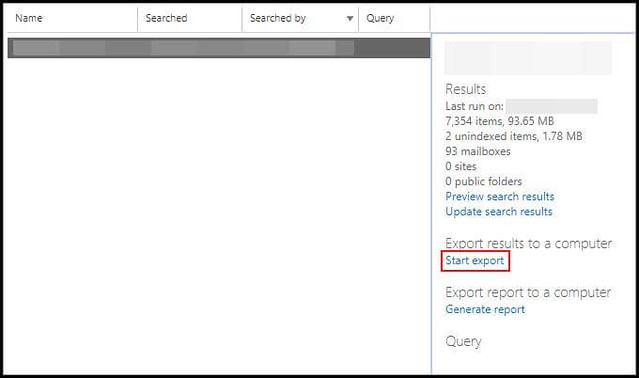
8. Just after clicking on the Search button, the feature starts looking for your desired items from an entire database of Office 365. Once the operation gets completed, click on Start export to download Exchange online mailboxes locally
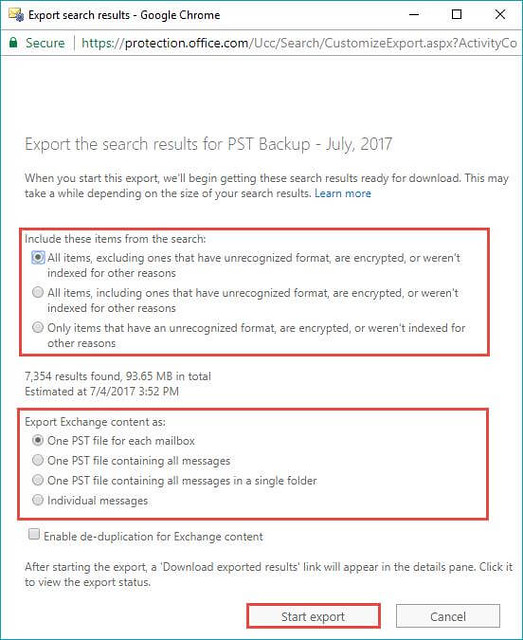
9. Use the file encryption option, if you want to encrypt the file. You can learn the complete amount of mailboxes that will be exported after your defined instructions. Things will be simple if you do not disturb the default settings of the current page. This is recommended because the data exporting becomes easy when settings are kept unmodified. After doing all these things, hit on Start export to continue
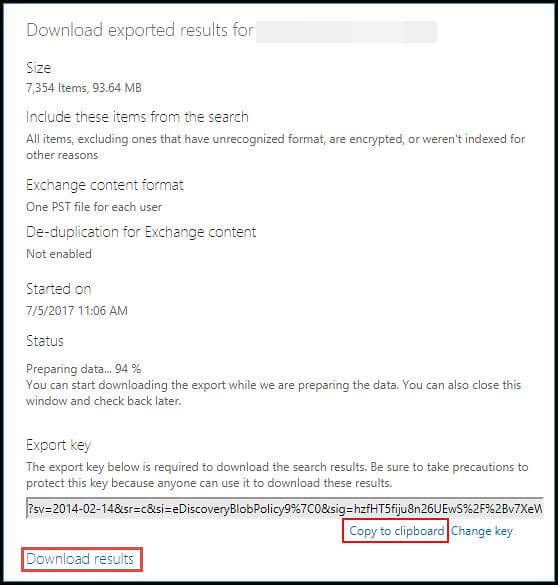
10. Finally, the downloading of Office 365 mailboxes to PST begins. Wait for a while and click on Download results when the procedure gets finished
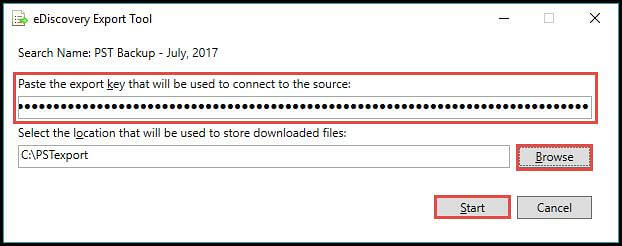
11. A box will appear in which an export key will be provided to you. Copy this key text and paste it somewhere on your PC. To perform this, use ‘Copy to clipboard’ link
12. Finally, you will see eDiscovery Export software in front of you. Paste the key in the blank text box of the software and then, click on Browse. Locate the location where Outlook data file is to be saved. Click on Start to begin exporting Office 365 mailboxes to PST format.
Measure # 2: Save Office 365 Emails To PST Through PowerShell
The solution is applicable only for an administrator of Exchange online account. Let us take an example to understand this measure in a simple way. You need to arrange following 3 prerequisites to exhibit the process :
- A source account is needed from which data is to be exported and suppose here the tenant is [email protected]
- Another admin account (say, [email protected]) is to be configured in Microsoft Outlook for exporting purpose.
- And, one more administrator account is needed with all migration rights and here, suppose this account is [email protected].
When you are completed with the presence of all these Exchange Online administrator accounts, begin with the following explained steps :
Step 1: Establish Connection with Exchange Server via PowerShell
- Execute ‘$UserCredential = Get-Credential’ command to originate the process to export Office 365 mailboxes to PST. Enter the credentials with username and password of Office 365 account, which is having all permissions within it. As per the example, the id is [email protected]
- Execute the following command
“$Session = New-PSSession -ConfigurationName Microsoft.Exchange -ConnectionUri https://outlook.office365.com/powershell-liveid/ -Credential $UserCredential -Authentication Basic –AllowRedirection”
- When the above cmdlet successfully gets finished, run the “Import-PSSession $Session”
Important Notes
- Ensure that you are entering correct id and password in Step (1)
- Only 3 chances are provided to establish connection by this measure
- Check that the admin account you are using is activated for remote PowerShell
- Verify that TCP port 80 traffic is opened between O365 and local machine
Step 2: Grant Access to Mailbox to Export Via PowerShell
Use the following command to grant [email protected] tenant complete access to the mailbox of [email protected] account :
“Add-MailboxPermission – User [email protected] -Identity [email protected] -AccessRights FullAccess -InheritanceType All”.
Step 3: Launch MS Outlook for a New Account
Open Microsoft Outlook on your PC with [email protected] id and check that [email protected] mailboxes are visible to you with the same id. However, permissions take time in configuration procedure so, have patience while implementing the entire process.
Step 4: Check the Settings of Outlook Configuration
Verify whether Microsoft Outlook has started configuration and downloading of messages or not. For this, you can take help of following steps :
- In same Outlook windows, click on File >> Info
- Click on the Account Settings >> Account Settings
- Select your source account and click on Change button
- Verify that ‘Use Cached Exchange Mode’ option is enabled
Step 5: Export PST File From the Mailboxes
With help of the import and export feature of Microsoft Outlook, export all mailboxes of [email protected] account in PST format. When you get completely finished with this, move to Step (6).
Step 6: Check that Exporting is Completely Finished
Examine the mailbox size of the server and compare this with resultant PST file of Step (5). For this, you can take help of following steps :
- From the left pane of the screen, right-click on the source mailbox and select Data file properties option
- Click on General >> Folder Size
- Select the tab of Server Data and learn the size value from ‘Total Size’ field
- Close all the opened windows of MS Outlook and determine the size of PST file that was exported in Step (5)
- Compare the size of both these file and if they match then, proceed to next step; else repeat the steps from starting again
Step 7: Remove All the Granted Permissions
When the file is exported successfully from Outlook email client, use the following command to erase all the allotted permissions that were earlier granted in Step (2) :
“Remove-MailboxPermission -User [email protected] -Identity [email protected] -AccessRights FullAccess”
Step 8: Close All the Established Sessions
Now it is the time to close all the established sessions after completing all the steps of exporting Office 365 mailboxes to PST. You have to execute “Remove-PSSession $Session” command to do this and hence, closing all the sessions that were established in Step (1).
Observational Verdict
The approaches explained here to archive Office 365 mailbox to PST is useful only at the administrative level. But, when it comes about the simple and easy method and that too for single Office 365 account users then, these workarounds fails here. In this case, end users are suggested to opt for Office 365 backup software that is an effortless solution to export Office 365 mailboxes to PST. Neither PowerShell command nor Outlook is required for download data from Exchange online tenant.
Author Bio: Author is the email consultant who delivers solutions associated with the problem related to web-based email platforms. Through this post, she had provided an approach for Office 365 Backup, which is executed at an administrative level.